What is Modern Authentication?
Modern authentication is an umbrella term for a combination of authentication and authorization methods between a client (for example, your laptop or your phone) and a server, as well as some security measures that rely on access policies that you may already be familiar with. It includes:
- Authentication methods: Multifactor authentication (MFA); smart card authentication; client certificate-based authentication
- Authorization methods: Microsoft’s implementation of Open Authorization (OAuth)
- Conditional access policies: Mobile Application Management (MAM) and Azure Active Directory (Azure AD) Conditional Access
What Changes when I use Modern Authentication?
When using modern authentication with on-premises Skype for Business or Exchange server, you’re still authenticating users on-premises, but the story of authorizing their access to resources (like files or emails) changes. This is why, though modern authentication is about client and server communication, the steps taken during configuring MA result in evoSTS (a Security Token Service used by Azure AD) being set as Auth Server for Skype for Business and Exchange server on-premises.
The change to evoSTS allows your on-premises servers to take advantage of OAuth (token issuance) for authorizing your clients, and also lets your on-premises use security methods common in the cloud (like Multi-factor Authentication).
Additionally, the evoSTS issues tokens that allow users to request access to resources without supplying their password as part of the request. No matter where your users are homed (of online or on-premises), and no matter which location hosts the needed resource, EvoSTS will become the core of authorizing users and clients once modern authentication is configured.
For example, if a Skype for Business client needs to access Exchange server to get calendar information on behalf of a user, it uses the Microsoft Authentication Library (MSAL) to do so. MSAL is a code library designed to make secured resources in your directory available to client applications using OAuth security tokens. MSAL works with OAuth to verify claims and to exchange tokens (rather than passwords), to grant a user access to a resource. In the past, the authority in a transaction like this one–the server that knows how to validate user claims and issue the needed tokens–might have been a Security Token Service on-premises, or even Active Directory Federation Services. However, modern authentication centralizes that authority by using Azure AD.

This also means that even though your Exchange server and Skype for Business environments may be entirely on-premises, the authorizing server will be online, and your on-premises environment must have the ability to create and maintain a connection to your Office 365 subscription in the Cloud (and the Azure AD instance that your subscription uses as its directory).
What doesn’t change? Whether you’re in a split-domain hybrid or using Skype for Business and Exchange server on-premises, all users must first authenticate on-premises. In a hybrid implementation of modern authentication, Lyncdiscovery and Autodiscovery both point to your on-premises server.
Check the Modern Authentication Status of your On-Premises Environment
Because modern authentication changes the authorization server used when services apply OAuth/S2S, you need to know if modern authentication is enabled or disabled for your on-premises Skype for Business and Exchange environments. You can check the status on your Exchange servers by running the following PowerShell command:
PowerShellCopy
Get-OrganizationConfig | ft OAuth*
If the value of the OAuth2ClientProfileEnabled property is False, then modern authentication is disabled.
For more information about the Get-OrganizationConfig cmdlet, see Get-OrganizationConfig.
You can check your Skype for Business servers by running the following PowerShell command:
PowerShellCopy
Get-CSOAuthConfiguration
If the command returns an empty OAuthServers property, or if the value of the ClientADALAuthOverride property is not Allowed, then modern authentication is disabled.
For more information about the Get-CsOAuthConfiguration cmdlet, see Get-CsOAuthConfiguration.
Modern Authentication and MobileIron
If you have enabled Modern Authentication and are pushing a configuration from your MobileIron core to end users’ devices, then you will need to ensure the following steps are taken to avoid any interruption to email on mobile devices.
OAuth for Sentry on Core

OAuth is supported with Standalone Sentry for Office 365.
The following scenarios must be compliant for OAuth to function correctly:
- The email client must support OAuth (iOS Native Mail, iOS Email+ and Android Email+)
- UEM must push an OAuth configuration to the email client
- UEM must enable Sentry for OAuth
Sentry 9.14.0 and 9.15.0 supports Azure AD Conditional Access Policy. For more information, see Configuring conditional access policy in Azure AD.
Configuring Sentry on Core for OAuth
You must configure Sentry to enable OAuth and provide the endpoints.
Before you Begin
Verify that you have Sentry 9.14.0 or later and Core 11.0.0.0 or later.
Procedure
- Login to Core with admin credentials.
- Click Services > Sentry.
- Click Add New > Standalone Sentry.
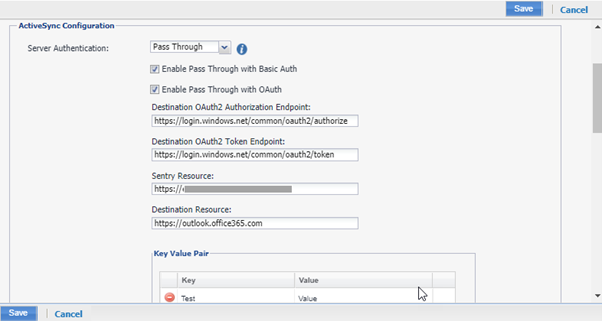
- Select Enable ActiveSync and enter the following details for OAuth.

a. Select Pass Through for Server Authentication
b. Select Enable Pass Through with OAuth
c. Destination OAuth2 Authorization Endpoint: “https://login.windows.net/common/oauth2/authorize”
d. Destination OAuth2 Token Endpoint: “https://login.windows.net/common/oauth2/token”
e. Sentry Resource: https://<SentryHostName>
f. Destination Resource: https://outlook.office365.com/
If Active Sync servers are not added by default, then configure Active sync server as outlook.office365.com.
Click Save.
Configuring iOS native email configuration with OAuth
Before you Begin
Verify that you have enabled “Use OAuth for Authentication” for iOS 5 and later versions.
Procedure
- Login to Core with admin credentials.
- Click Policies and Configs.
- Click Edit on the exchange configuration.
- Enable Use OAuth for Authentication.
- Under iOS 5 and Later Settings, enter the following details:
OAuth Sign In URL: https://<SentryHostName>/proxyservice/oauth2/authorize
OAuth Token Request URL: https://<SentryHostname>/proxyservice/oauth2/token

Click save.
Configuring Android and iOS Email+ with OAuth
For more information on configuring Android or iOS Email+ for OAuth, see Email+ Product Documentation.
KVPs for Email+ Configuration
For OAuth, ensure to set “eas_min_allowed_auth_mode” to “modern_auth” and provide the modern_auth_authority_url and modern_auth_resource_url for appropriate OAuth configuration:
- eas_min_allowed_auth_mode: modern_auth
- modern_auth_authority_url: https://<SentryHostname>/proxyservice
- modern_auth_resource_url: https://<SentryHostname>
For OAuth Email+ CBA user, the following KVP must be provided:
- email_login_certificate = <CBACertificateName>.pfx
Configuring conditional access policy in Azure AD
You can configure the conditional access rules in Azure for OAuth to function correctly.
- Login to Azure portal with admin credentials.
The admin has to be super admin who has premium features to configure Conditional Access rules. - Click Azure AD Conditional Access > Named Locations > IP Range Locations > New IP Range Location.
- Click Add and enter the IPv4 or IPv6 address range.
- Figure a name and Sentry IP address with Subnet > Add > and enable Mark as Trusted location > Create.
- On the Home tab, click Conditional Access Policies > Create New Policy.
- Under Users and Groups, select Users and Groups.
- Search for the appropriate Users or Groups and click Select.
- Under Cloud apps or actions, select apps > Office 365.
- Under Conditions > Locations > Any Location > Configure “Yes” under Include to “Any Location“.
- Under list of locations, select Selected locations under Exclude.
- Select Grant access as block access > require one of the selected controls.
- Select Enable Policy > On> Create.
Please note that users will be prompted to enter in their email password so they will need to have this to authenticate on the device.
If you have any queries, please feel free to contact us here at [email protected]
Resources
Our Voice
5 Ways to Evolve Your Remote Working Cyber-Security Strategy
Our Voice
CWSI announced as one of Ireland’s Best Managed Companies
Webinar


